Part-3
This article is the 3rd part of our series Mesh Analysis: Simple to advanced tutorials for all students. For next parts to study, check the related topics with this post.
In previous Part-2 we have calculated the value of mesh current I1 = 0.5Amp. This can be seen as shown in the following circuit diagram.
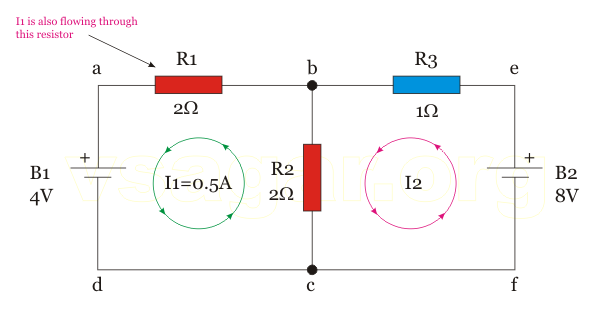
Here you can see that I1 = 0.5Amp which is also flowing through R1. Now we shall calculate the value of I1 using different style of mesh currents, as shown in the below and show that the current flowing through R1 has the same value, even though the mesh current style is different.

Step#1
First we shall calculate the equation for I1. Observe that I1 is flowing through the loop (e-b-a-d-c-f-e), as shown above. Also note that there are two currents flowing through R3 i.e. (I1 + I2).
So we write the equation for I1, first. We start from point ‘e’ –
1.(I1 + I2) + 2.I1 + 4 – 8 = 0
∴ 3.I1 + I2 = 4 … (1) … this equation is obtained as per the direction of I1.
Now we write the equation for I2. We start from point ‘b’.
1.(I1 + I2) + 2.I2 – 8 = 0
∴ I1 + 3.I2 = 8 … (2)
Step#2
Now using equation (1) and (2) as simultaneous equations, we shall obtain the value of I1, as follows –
-9.I1 -3.I2 = -12 … (1) … we have multiplied with (-3)
I1 + 3.I2 = 8 … (2)
So finally we get –
-8.I1 = -4
∴ I1 = 0.5Amp
In this way, you can take any direction and any style of the mesh currents but the answer will be always same.
Please let me know, how did you like these posts. If you really liked them, I would like to know your feedback, which will help me analyse my writing for more posts on Mesh Analysis.

One thought on “Mesh Analysis: Simple to advanced tutorials for all students Part-3”